Cloud Practitioner - AWS Networking
A Virtual Private Cloud (VPC) is essentially your private network in AWS. When you create a VPC you get an isolated section of the AWS Cloud. Inside this isolated section is where you organize your resources into Subnets:
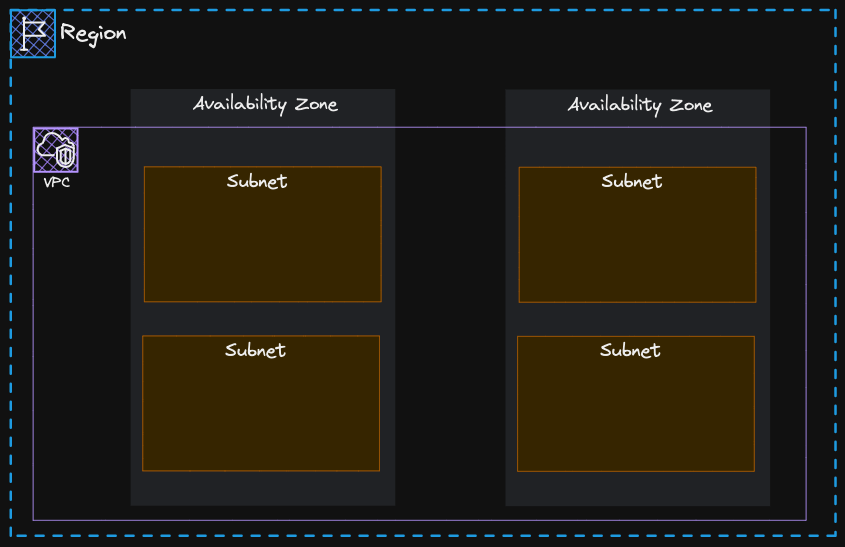
Ideally, you’d divide your private network across multiple Availability Zones for resilience. Within each AZ you can then, configure multiple Subnets.
However, right now those empty containers are useless if you don’t fill them with something useful. How about throwing some EC2 Instances on them?:
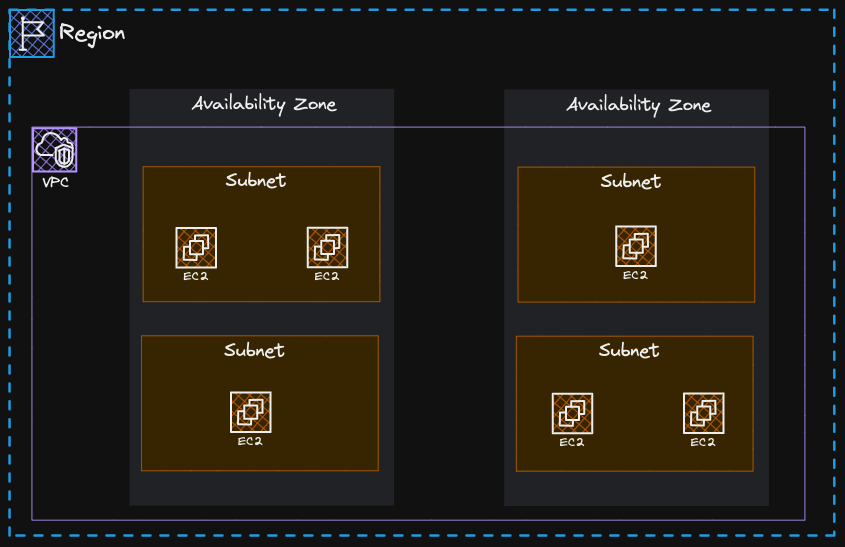
Alright, you now have several EC2 Instances spread out on different Subnets located in different AZs. But, what now?, well, Subnets would be useless if they weren’t able to interact with each other in some way.
VPC Connectivity
It happens that a VPC is nothing but a range of private IP addresses, and a Subnet is a subrange of that VPC’s address range. When working with networks in the AWS Cloud, you have to choose your network size by using the well-known CIDR Notation.
CIDR Notation
The CIDR Notation is a compressed way of representing a range of IP addresses. Basically, a range of IP addresses tells you how many IP addresses are available to you.
For example, the address 192.168.1.0/24 tells you that the first 24 bits of the IP address are fixed, while the rest 8 bits are flexible. This means that with those 8 bits you have 255 IP addresses available to you. Keep in mind that, the higher the number after the /, the smaller the number of IP addresses will be available, for Instance, a range of 192.168.1.0/24 is smaller than 192.168.1.0/16.
Going back to our example, let’s say that when you created your VPC you specified a CIDR range of 10.0.0.0/16 for it, and you decided to create 4 different Subnets spread out in different AZs, each with IP ranges that fall within your VPC’s address space:
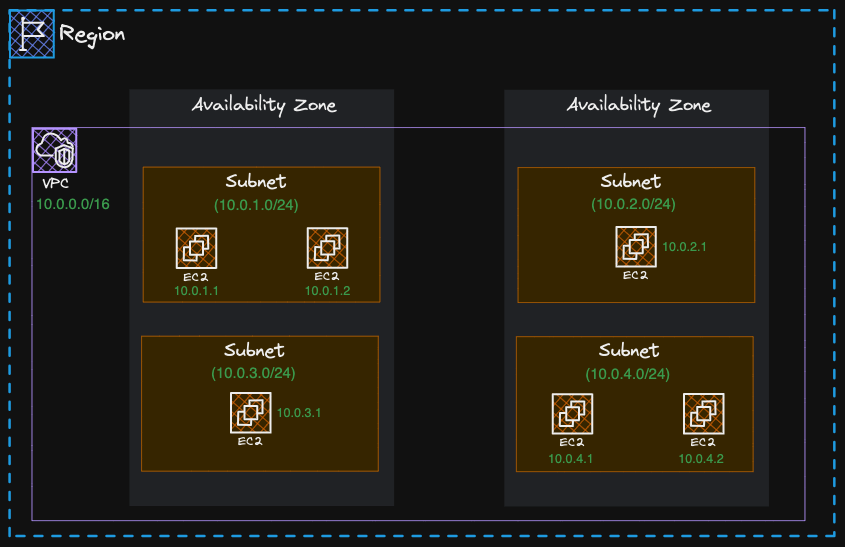
Now you’re all set to enable communication between your resources.
Keep in mind that, in AWS the smallest IP range you can get is /28 which provides you with only 16 IP addresses, while the largest IP range you can have is /16, which provides you with 65,536 IP addresses, and remember, AWS reserves 5 IP addresses from every Subnet you create for its own purposes.
Communication between Subnets
As I mentioned before, Subnets would be useless if they weren’t able to interact with each other.
The component that makes possible the communication between Subnets is the Router. However, in the context of the AWS Cloud the component that makes this possible is the route table. You see, a route table contains the routes that indicate where the network traffic is sent/directed.
Every time you create a VPC, a default route table is created and associated to it. This default route table is known as the main route table and it allows all the components inside the VPC to communicate with one another locally by default:
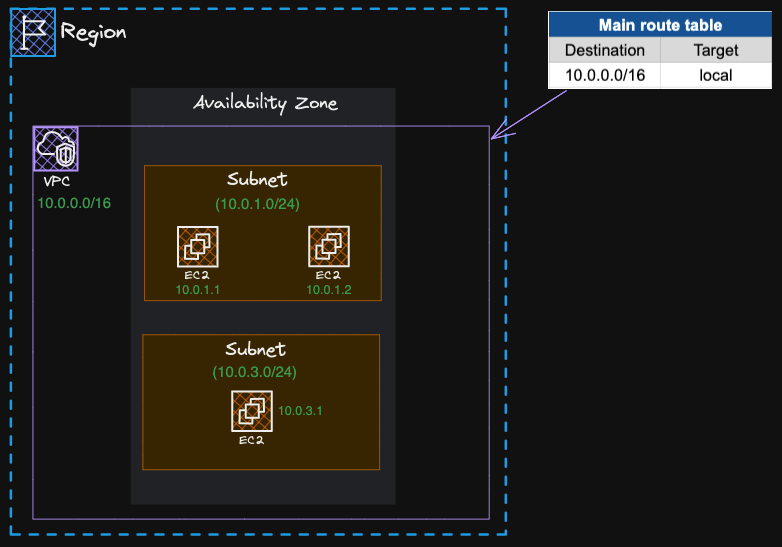
As you’ll see later on, you can also create your own custom route tables and associate them to your Subnets.
For the sake of this lesson, just keep in mind that the purpose of the main route table is to be used implicitly by Subnets that do not have a route table associated. These Subnets will automatically follow the rules of the main route table.
Public Subnets
Currently, none of the components within your VPC is able to reach out the outside world; their communication is limited only to the boundaries of the VPC itself. However, you may have an internet-facing resource on your servers, such as a website, that you want to expose to the public Internet.
This implies that you need your EC2 Instances to communicate to the outside world, in this case, the public Internet. For this purpose, you must first attach an Internet Gateway to your VPC. Next, create a custom route table and add a route pointing to the Internet Gateway, something like: 0.0.0.0/0 -> igw-id. Lastly, don’t forget to associate this custom route table with the Subnet where the EC2 instances you want to expose are located:
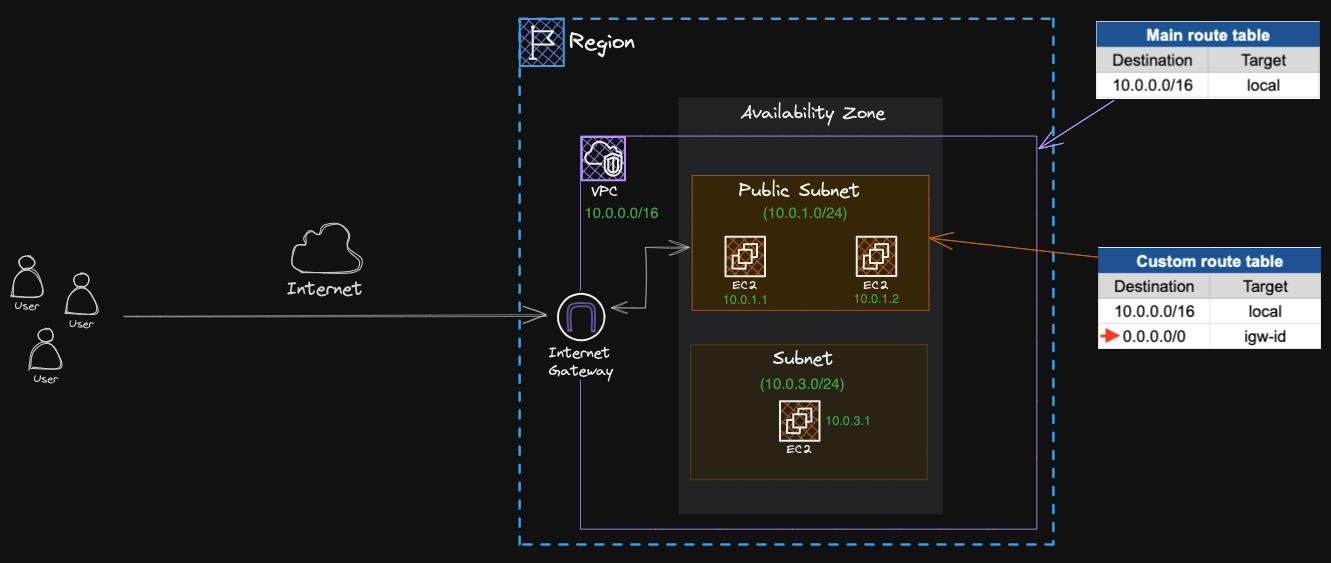
Of course, always ensure your Instances have an IPv4, IPv6 or an Elastic IP address assigned, and that your Security Groups and NACLs allow the relevant traffic.
Keep in mind that, a Subnet is considered “Public” just because its EC2 Instances can receive inbound traffic directly from the open Internet.
Private Subnets
It may happen that you might want certain resources within a Subnet to be accessible only through your private network, maybe from your own data center. For example, a database that contains information about your customers and their history.
For this purpose, you don’t want an Internet Gateway. Instead, what you need is a Virtual Private Gateway:
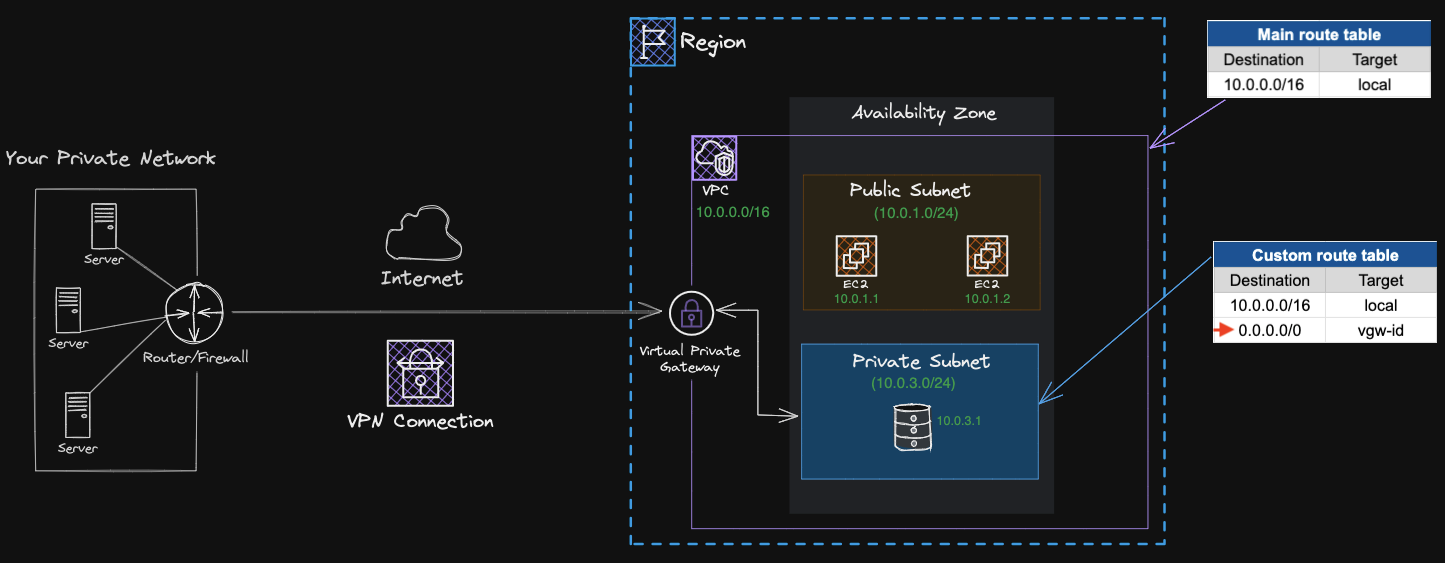
A Virtual Private Gateway allows you to create a VPN connection between your private network and your VPC, ensuring that all the traffic received in your VPC comes from an approved network.
Public & Private Subnets in Action
A typical cloud configuration involves having a public-facing application running on several EC2 Instances placed in a public subnet communicating with databases located in a private subnet:
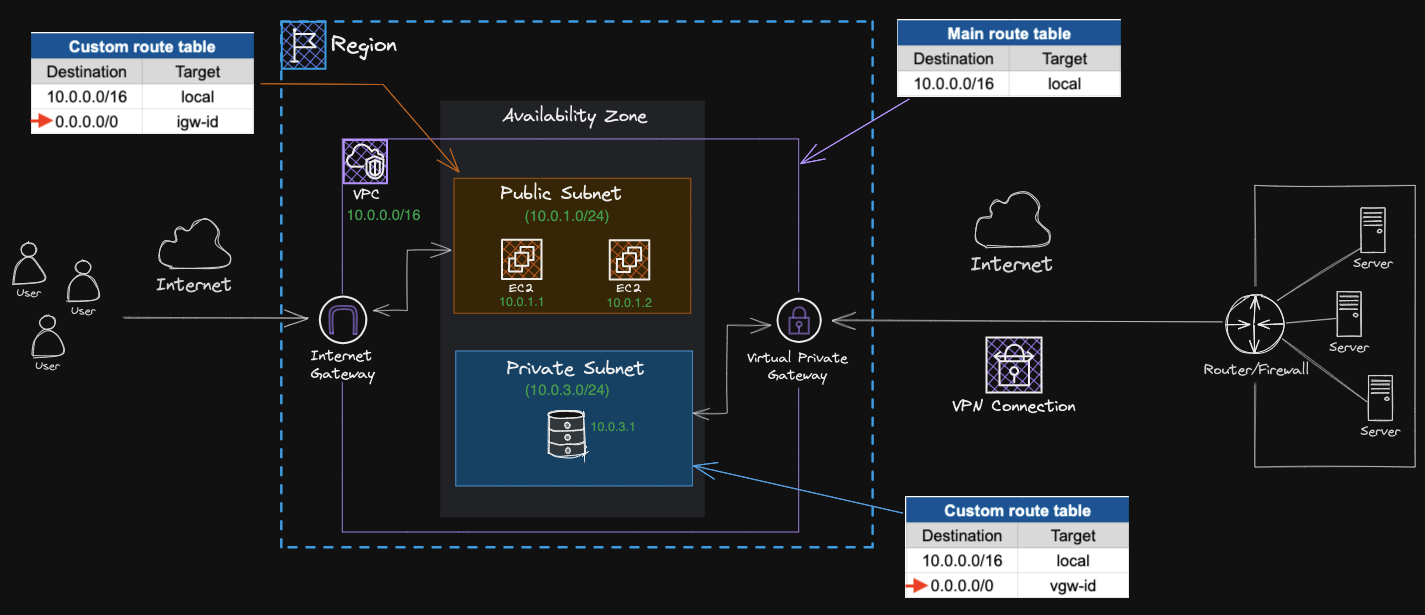
Sometimes, however, you might need that your private resources, in this case your databases, to continue receiving software updates from the public Internet, but at the same time, you want to prevent the Internet from initiating connections to these private resources.
To fulfill this request you need to use a NAT Gateway. By placing a NAT Gateway in a Public Subnet you can get you private Instances in a Private Subnet to connect to the Internet. All you have to do is to associate an Elastic IP address to your NAT Gateway and add a route in your Private Subnet’s route table that points to that NAT Gateway:
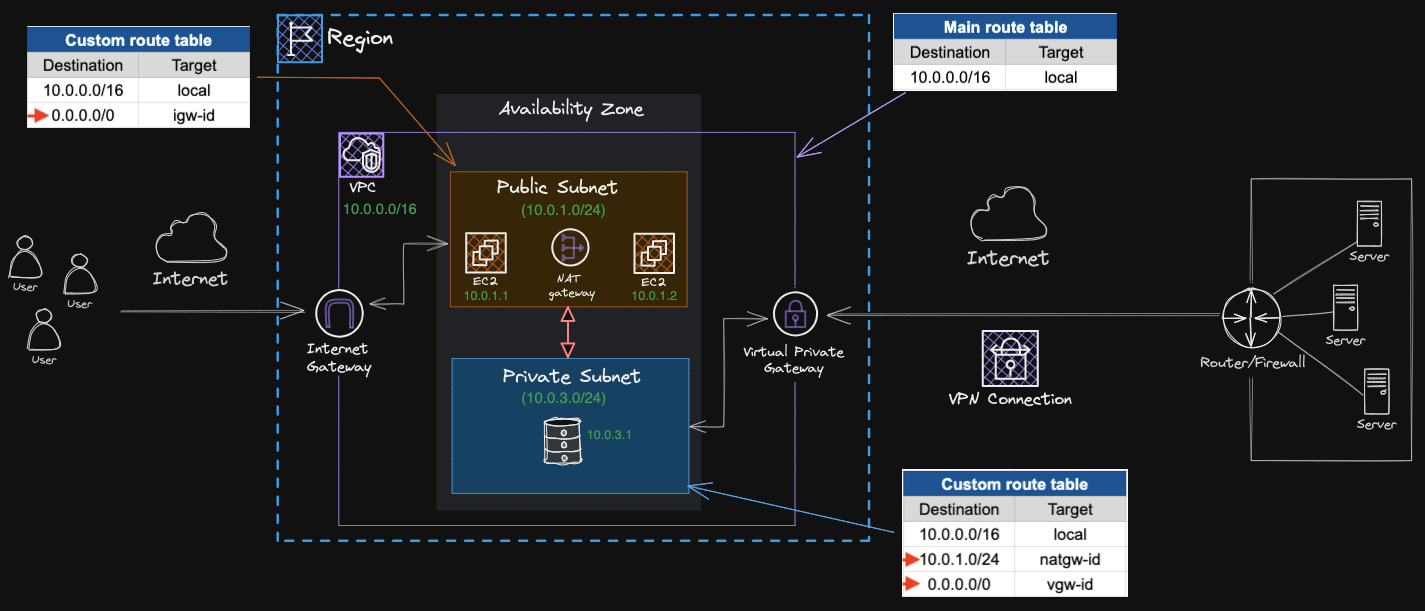
This ensures that when your private resources initiate traffic through the NAT Gateway, they can receive responses back in, but external traffic from the Internet cannot initiate inbound traffic.
Notice that what you’ve just done here is considered a Public NAT Gateway, since you’re routing traffic from the NAT Gateway to the Internet Gateway. However, you can also use a NAT Gateway to route traffic to other private resources, such as your on-premises network or other VPCs. This is known as a Private NAT Gateway.
Just keep in mind that NAT Gateway is not supported for IPv6 traffic. In this case you’d need an Egress-only Internet Gateway.
AWS Direct Connect
Although a VPN is private and encrypted, it still uses a regular Internet connection which has bandwidth that is shared by many people using the public Internet.
If you’re looking for a truly private, dedicated connection that is not shared with no one else, you should take a look at AWS Direct Connect. This offer basically allows you to establish a physical, private, dedicated fiber connection between your on-premises to AWS:
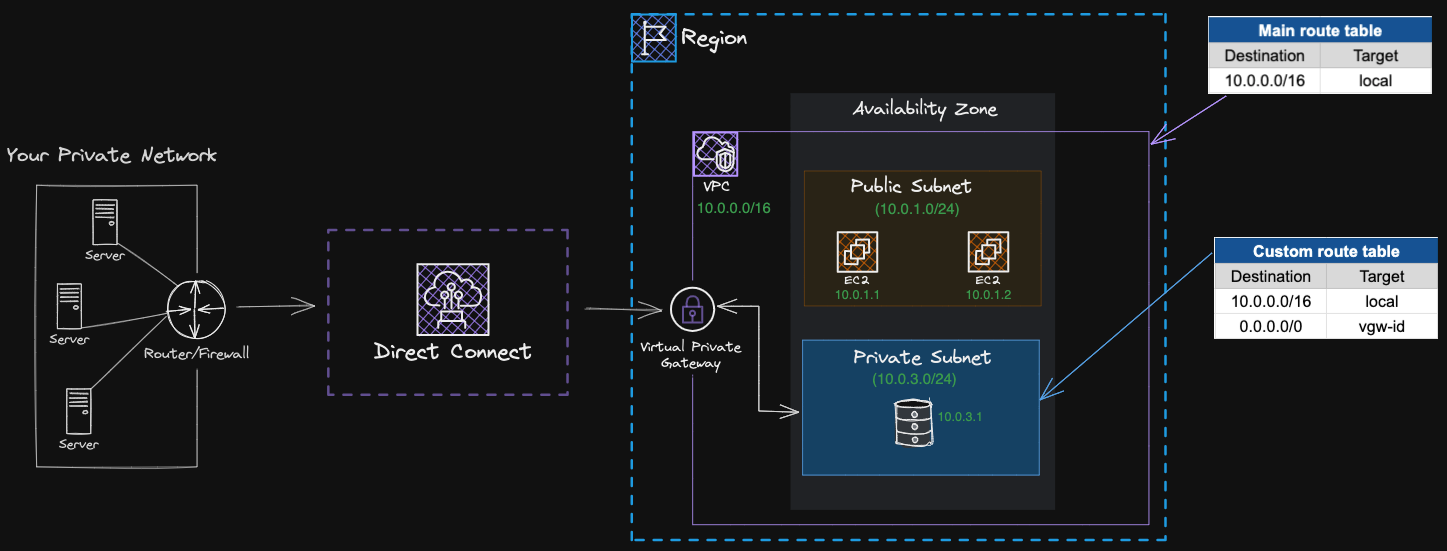
Actually, you’re working with a Direct Connect Location (DCL) which is an AWS-trusted data center partner located close to your area.
VPC Security
Now that you know how to route traffic between locations, it’s time to learn how to determine whether that traffic is allowed to enter or leave your resources.
A packet is just a unit of data sent over the internet or a network. For the sake of this example, let’s imagine ourselves as a packet traveling from one subnet to another within a VPC.
Network Access Control List (NACL)
You can think of Subnets as different territories and Network ACLs as passport control officers. When you (the packet) arrive at the perimeter of a territory boundary (the target subnet) you get checked against the passport control officer’s approved list to determine if you’re allowed to enter or even to leave.
A Network Access Control List NACL’s job is to determine if you (the packet) are allowed to cross the subnet boundary, in or out. However, it doesn’t ensure whether the packet reaches its final destination or not, for example, an EC2 Instance.
These are some considerations to keep in mind when working with NACLs:
- A NACL acts as a firewall at subnet level.
- Every time you create a VPC, a default NACL is created and associated to it. This NACL by default allows all inbound and outbound traffic.
- You can create your own custom NACLs. When a custom NACL is created, by default all inbound and outbound traffic is denied.
- When you create a new Subnet, it is automatically associated with the default NACL. However, if you prefer not to use this default setting, you can create a custom NACL and associate it with your Subnet.
- With a NACL you can create
ALLOW/DENYrules for Inbound traffic, and createALLOW/DENYrules for Outbound traffic as well.
Security Groups
If the Network ACL is a passport control officer, a Security Group is the doorman at your building (an EC2 Instance). The doorman will check its list to see if you (the packet) are allowed to enter the building.
However, unlike the passport control officer, the doorman won’t bother to check its list again when you (the packet) leave the building.
Every EC2 Instance must be associated with a Security Group when launched. However, take into account the following considerations:
- A Security Group acts as a firewall at Instance level.
- Every time you create a VPC, a default Security Group is created and associated to it. This Security Group allows all Inbound and Outbound traffic by default. So be careful if you attach this Security Group to some of your EC2 Instances.
- You can create your own custom Security Groups. When a custom Security Group is created, by default all Inbound traffic is blocked but all Outbound traffic is allowed.
- With a Security Group you can only create
ALLOWrules for Inbound and Outbound traffic.
The round-trip of a packet
At first glance, a NACL and a Security Group carry out the same thing: let good packets in, keep bad packets out. Nonetheless, the key difference between them is that a Security group is Stateful whereas a Network ACL is completely Stateless.
To better understand this difference let’s get back to our previous example. You (the packet) are traveling from one EC2 Instance to another EC2 Instance located in a different subnet in the same VPC:
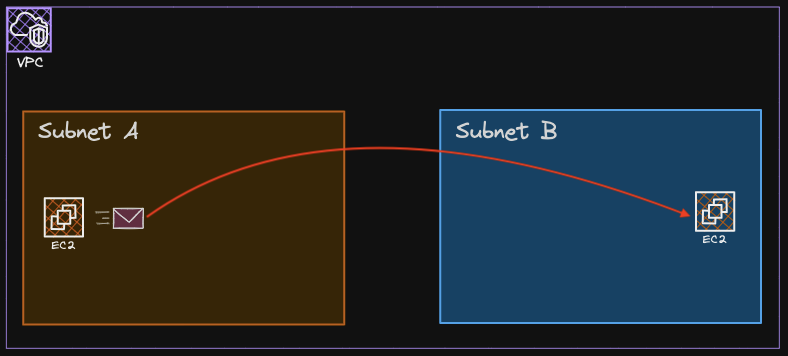
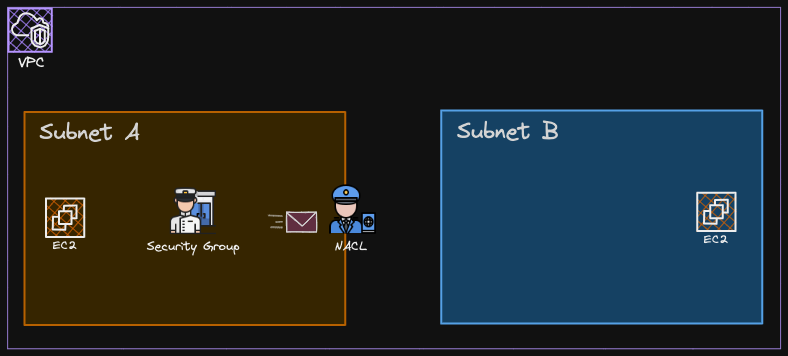
When you arrive at the boundary of the Security Group of your EC2 Instance in Subnet A, the doorman won’t check you out since all Outbound traffic is allowed to leave by default:
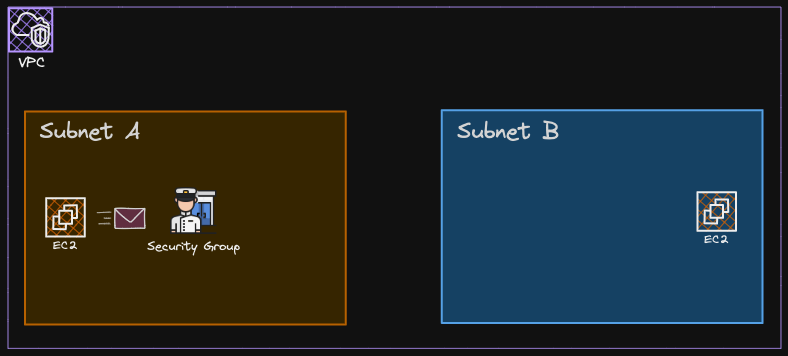
Moving on, when you get at the boundary of Subnet A, a passport control officer (the NACL) will come into play. This guy doesn’t care what the doorman allowed to pass, it has its own list to decide whether you can continue or you cannot:
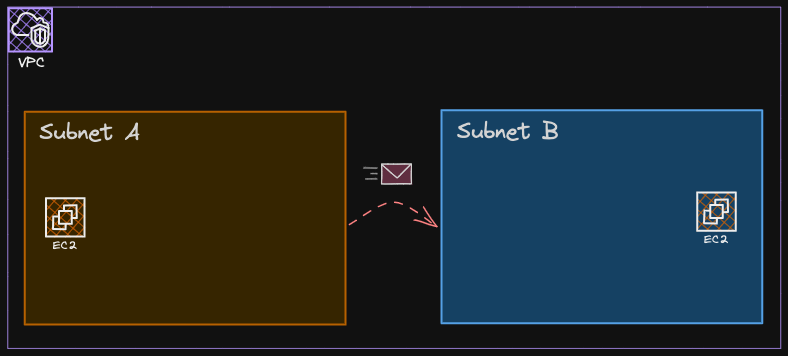
Let’s say that you’re allowed to cross the border. You’re now leaving Subnet A’s domain, and entering Subnet B’s space:
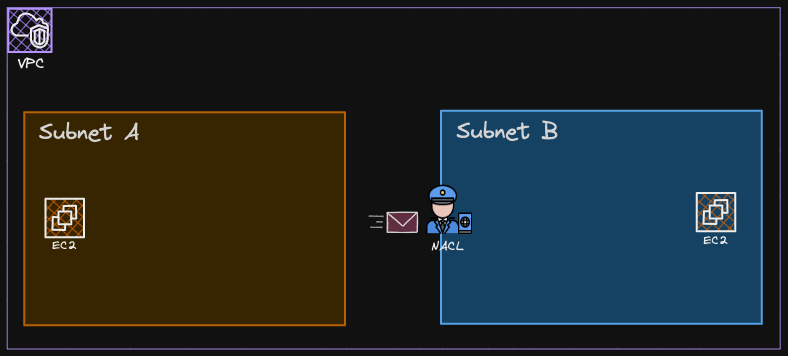
Once you land on Subnet B’s territory, you have to go through the passport control procedure, and if you’re approved to cross the border, you’ll be allowed to enter and continue with your journey until you reach your final destination:
By the time you reach your final destination in Subnet B, which is an EC2 Instance, the doorman of this Instance will check its list to see if you’re allowed to enter the building:
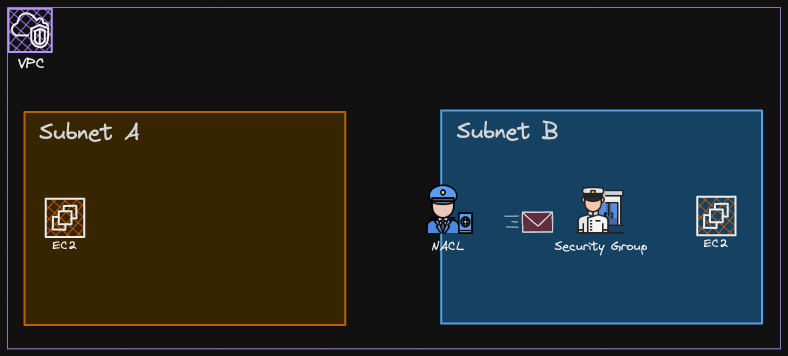
And of course you’re in the list!, you may proceed to enter:
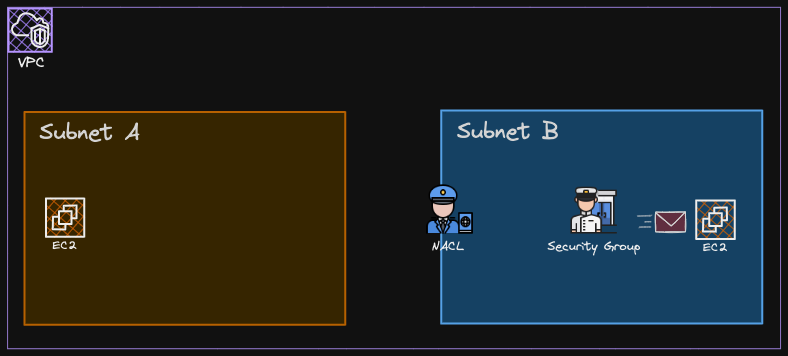
Now that the transaction is complete, it’s time to go all the way back home, and this is where Stateful vs Stateless will start making sense.
Remember that by default, the doorman won’t bother checking its list to see if you’re allowed out. You may leave the building without any concern:
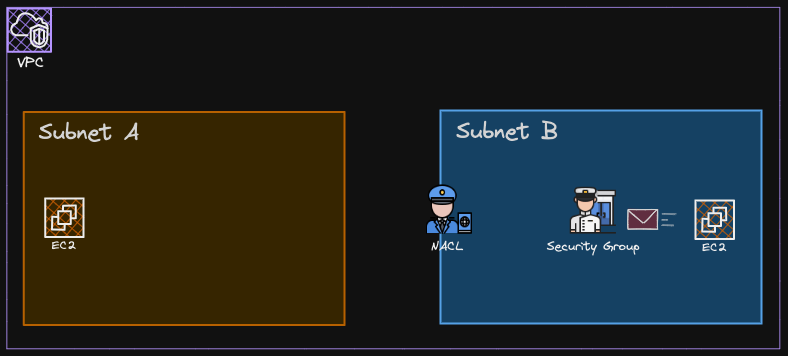
However, things are different when you try to leave Subnet B’s territory, since by the time you get to its boundary, the passport control officer (NACL) will show up once again to see if you’re allowed to leave:
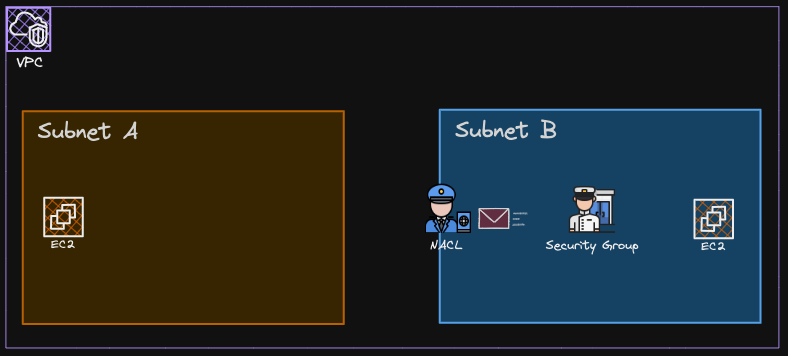
And of your course you’re allowed to leave:
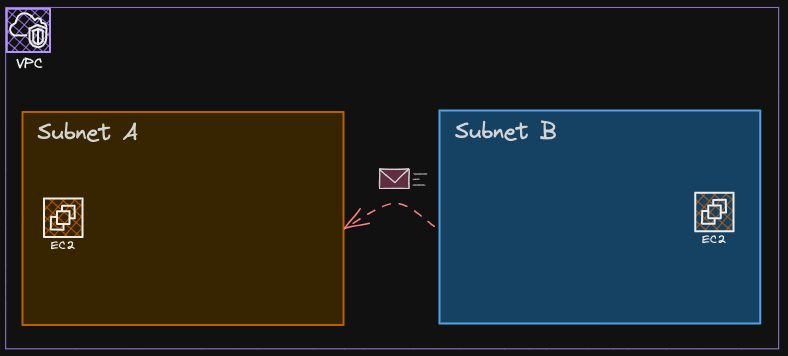
However, as soon as you get to the other side, once again, you must undergo the passport control procedure even though being on home soil:
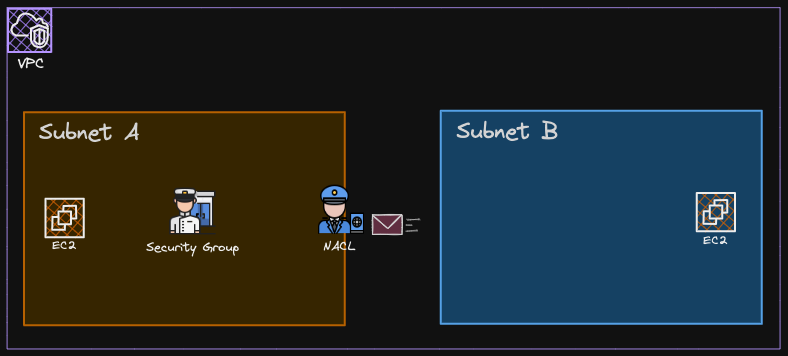
You cross Subnet A’s border and head back into the EC2 Instance you originally come from. The doorman recognizes you and greets you: “Welcome back home, boss!”:
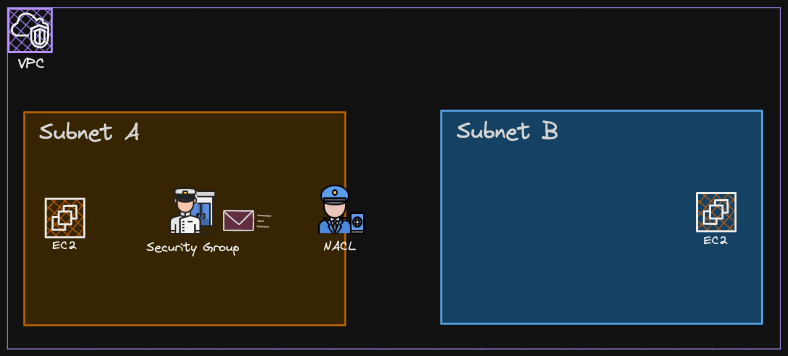
Now you’re back where you begin:
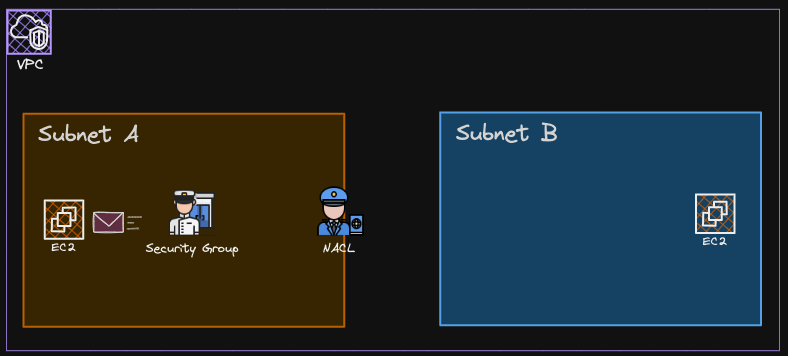
From the example, can you spot something here?. Yes, NACLs don’t have memory, they don’t remember your at all, they always have to check their list no matter who you’re or where you come from, this is what Stateless is all about.
On the other hand, Security Groups do have memory, they keep state, they remember you the next time you arrive. This is what Stateful means.
The Default VPC
Every AWS Account comes with a default VPC in each AWS Region. Any resource you place within a default VPC automatically becomes public and accessible by the open Internet. But what is the reason behind this behavior?, let’s explore it.
A default VPC also comes with several default Subnets. One default Subnet is allocated in each AZ, and since a VPC spans all the AZs within an AWS Region, the number of default Subnets will correspond to the number of AZs available for that AWS Region:
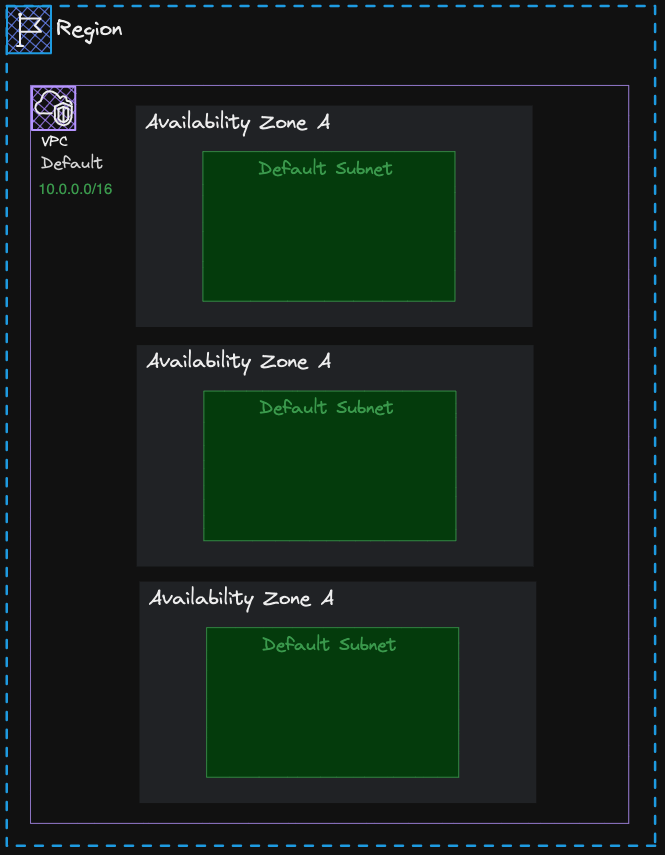
A default VPC also comes with other default components such as:
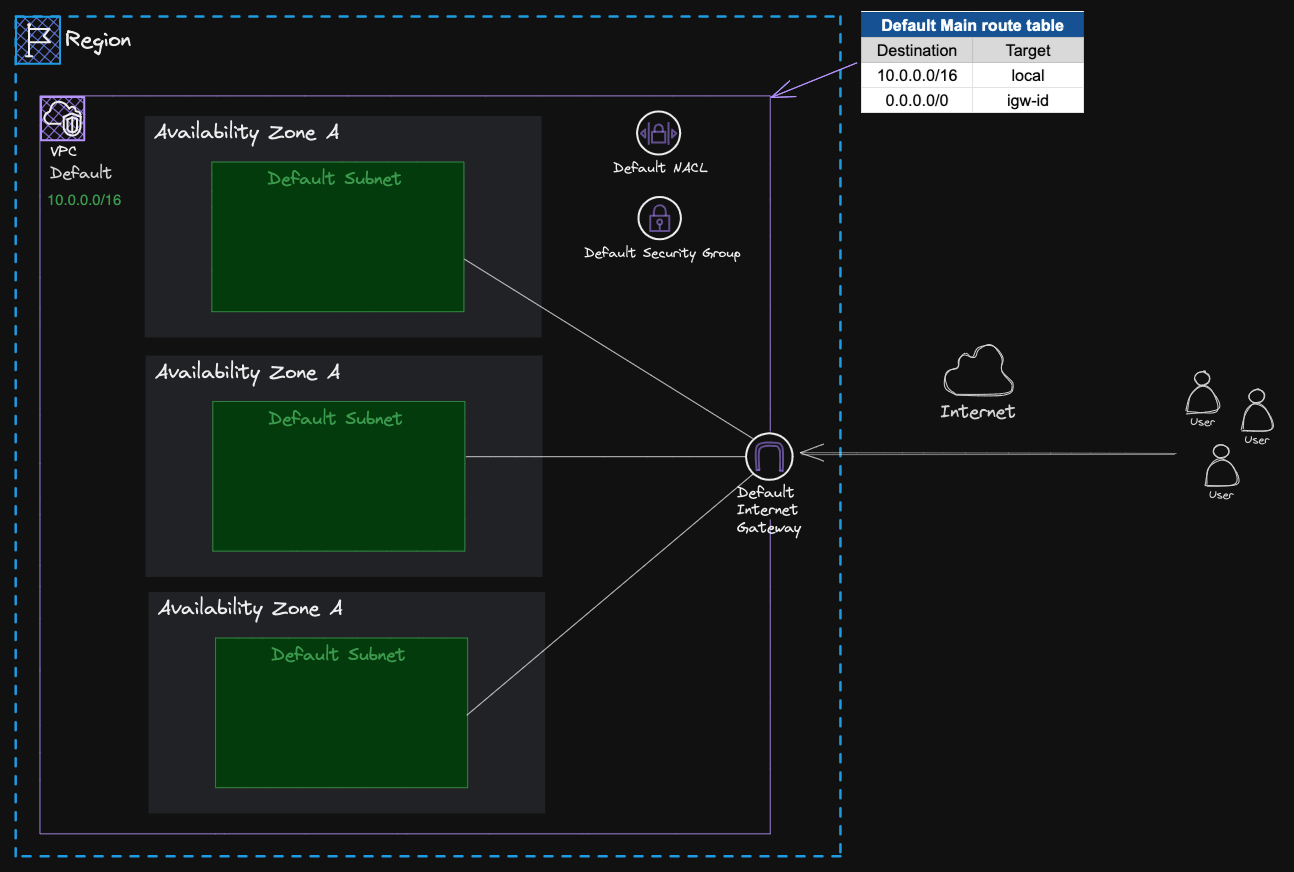
- A default Internet Gateway attached to it.
- A default Route Table that implicitly associates all the default Subnets in the default VPC. Additionally, this default Route Table contains a route pointing the the default Internet Gateway.
- A default NACL that allows all traffic in and out. This NACL is associated by default to the default Subnets in the default VPC.
- A default Security Group that allows all Inbound and Outbound traffic.
Due to all these reasons, when you place an EC2 Instance in a predefined Subnet from the default VPC, it’ll automatically become public and with access to the Internet. Be cautious about what you put in a default VPC.
VPC Peering Connections
By default all VPCs are isolated from each other. However, you can get a VPC to communicate to resources of another VPC as though they were on the same network. No matter, if the target VPC belongs to a different AWS Region or AWS Account.
A VPC Peering is a network connection between two VCPs. Let’s say for example that you want to get the EC2 Instances in the Marketing VPC to get in touch with the EC2 Instances in the Finance VPC. To get this working, you’d establish a VPC Peering connection between these two VPCs:
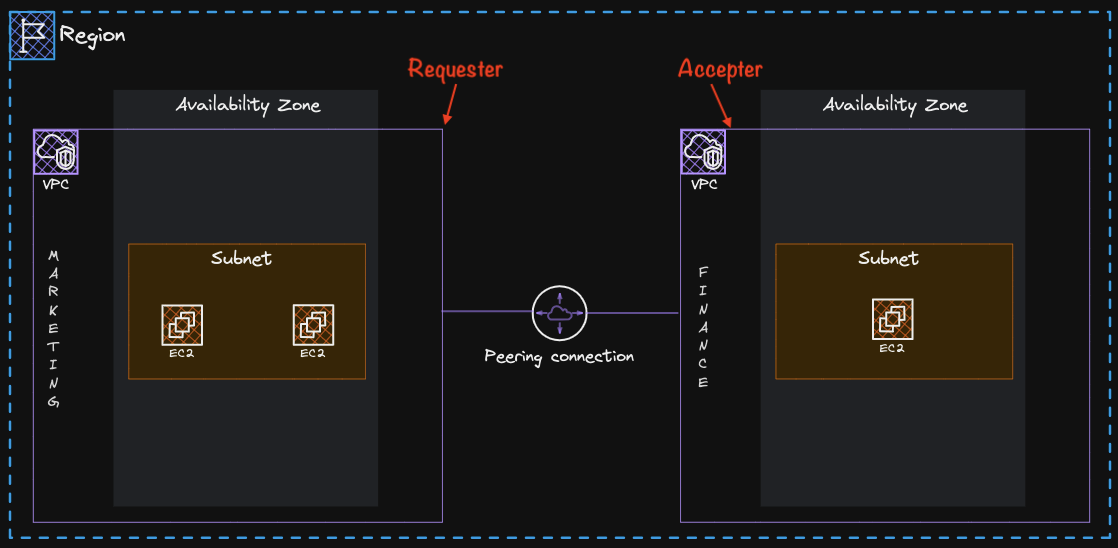
One VPC acts as a Requester and the other as an Accepter. The Requester sends a peering requests to the Accepter, and the Accepter has to accept the peering request. To enable the flow of the traffic between the VPCs, the owner of each VPC must manually add routes in each VPC route tables. The route must point to the IP address of the other VPC.
Now suppose that you also want the EC2 Instances in the Development VPC to access the same EC2 Instances placed in the Finance VPC, you would have to establish another VPC Peering connection between these two VPCs:
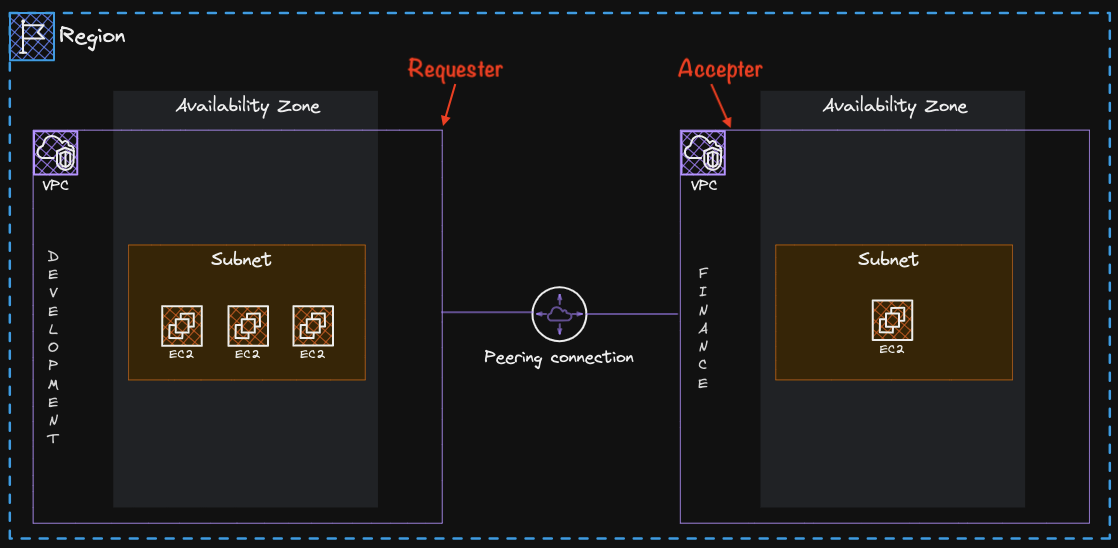
Keep in mind that peering connections are not transitive. This means that while traffic can flow between Marketing and Finance, and between Development and Finance, no traffic is allowed between Marketing and Development. You’d need another peering connection between them.
VPC Endpoints
Let’s say that you want to connect an EC2 Instance located in a private Subnet to an S3 bucket, How would you do that?. Well, at first glance there’s no way you can do this since AWS S3 sits in a public zone whereas your EC2 Instance resides in a private zone. If you don’t have a clue what public and private zones are, check this article out where I explain in more detail:
Essentially, your EC2 Instance doesn’t have access to the open Internet and therefore, it can’t connect to any AWS public service. Of course, you can always place a NAT Gateway in the Public Subnet and add a route to your private Subnet’s route table that points to that NAT Gateway. But there is a better way.
A VPC Endpoint is a gateway object that you create and place inside a VPC. This endpoint will allow you to connect your VPCs to other AWS Services, Third-party services, or services hosted by other AWS accounts, without exposing your traffic to the open Internet. All your traffic remains within the AWS Global Network:
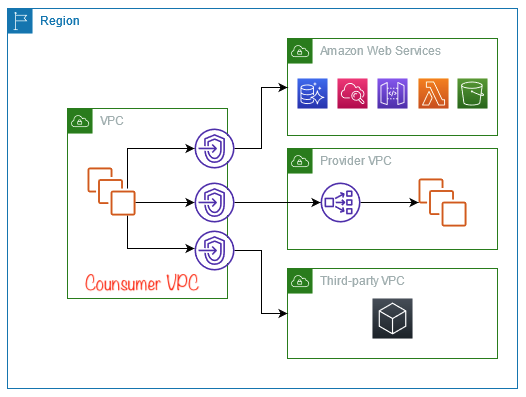
Under this configuration, you won’t require a NAT device, VPC Peering connection, Internet Gateway, or AWS Direct Connect. Your network traffic never leaves the AWS Backbone.
VPC Endpoints come in two flavors:
- Gateway Endpoints: These are designed for specific AWS services. Typically for accessing DynamoDB or S3. This type of endpoints don’t generate additional fees.
- Interface Endpoints: These are designed to facilitate communication with a wide range of supported AWS services. These types of endpoints rely on the AWS PrivateLink service to work. Keep in mind that you’ll be charged hourly for these endpoints, as well as for the data transfered.
Going back to our previous example, you could either use a Gateway or Interface endpoint to maintain your application’s privacy while granting it access to your files on S3. This eliminates the need for a NAT Gateway in a Public Subnet redirecting traffic to the internet Gateway.
AWS PrivateLink
It’s the service that allows you to connect your VPCs to other AWS Services. Under the hood, AWS PrivateLink utilizes VPC endpoints to establish the communication between your VPCs and other external services.
When you generate an Interface Endpoint, an Elastic Network Interface (ENI) with a private IP address is created in your Subnet. This ENI serves as the entry point for traffic destined to that service, actually, your AWS PrivateLink endpoints will show up in your VPCs as ENIs with private IPs.
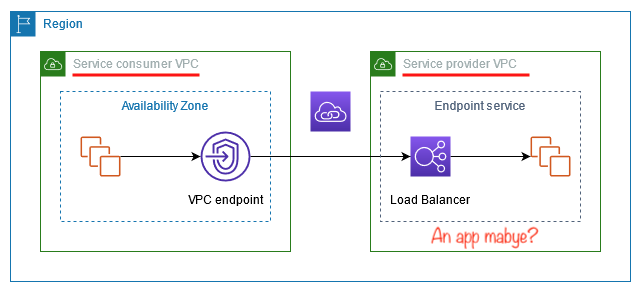
The way it works is rather simple. You discreetly expose a service/application sitting in one VPC (service provider VPC) to other VPCs (consumer VPCs) inside an AWS Region. This way, the consumer VPC begins connections to the service provider VPC:
Other AWS Network Services
AWS Global Accelerator
This service optimizes the traffic between end-users and your application. Since the public Internet can get congested from time to time, AWS claims that by using their private global network infrastructure, the connection speed between the user and your application can improve up to 60% versus de public Internet.
Basically, AWS Global Accelerator uses the AWS Backbone to route traffic to the nearest edge location, and from there, the most efficient path to reach your application endpoints is determined, whether they’re hosted within AWS or external locations.
The purpose of the AWS Global Accelerator is to reduce the network latency between your end-users and your applications.
AWS Transit Gateway
Managing multiple connections between VPCs and on-premises networks can quickly become complex. With this service, you’ll be able to connect thousands of VPCs and on-premises networks using a single Gateway.
For Instance, your organization may have several business departments: Marketing, Development, Sales, HR, etc, each requiring its own VPC. While you could establish VPC Peering connections between them, the outcome would be a highly complex, intricate web of VPC Peering connections, especially as your company grows.
Instead of maintaining separate connections for each VPC, you can centralize them all in a central hub called AWS Transit Gateway. This way, when data moves from one VPC to another, it goes through the Transit Gateway, simplifying your network architecture.
In essence, AWS Transit Gateway functions as central hub for your data traffic.
AWS Route53
DNS is the guy responsible for translating a domain name into its corresponding IP address.
Let’s say for example that when you type www.google.com into your browser’s address bar, an internal resolution process occurs to retrieve the IP address 142.250.189.206. Only then, your browser sends a request to this IP address to retrieve the information you asked for.
You can use AWS Route 53 to register domain names an manage DNS records for domain names, but you can do more. For example, you can direct traffic based on different route policies such as: latency-based routing, geolocation DNS, geoproximity and weighted round robin.
AWS CloudFront
It’s a CDN service that relies on Edge Locations to cache and get your content (web pages, images, video, etc) closer to where your customers are physically located.