LetsDefend - Brute Force Attack
During this challenge, you’ll use Wireshark and the terminal to investigates the extent of a brute-force attack carried out by an adversary. You’ll have to use all the your knowledge and skills you’ve acquired so far, you’ll analyze network traffic and system logs to uncover the various brute-force attacks used against a target server.
The scenario is as follows:
“Our web server has been compromised, and it’s up to you to investigate the breach. Dive into the system, analyze logs, dissect network traffic, and uncover clues to identify the attacker and determine the extent of the damage.”
Without further ado, let’s dive deep into it.
What is the IP address of the server targeted by the attacker’s brute-force attack?
Before answering this question, make sure the target server is actually under a brute force attack. To determine this, open the provided .pcap file with Wireshark.
Once there, I suggest you changing the way the Time field is displayed for your packets to make it easier to interpret:
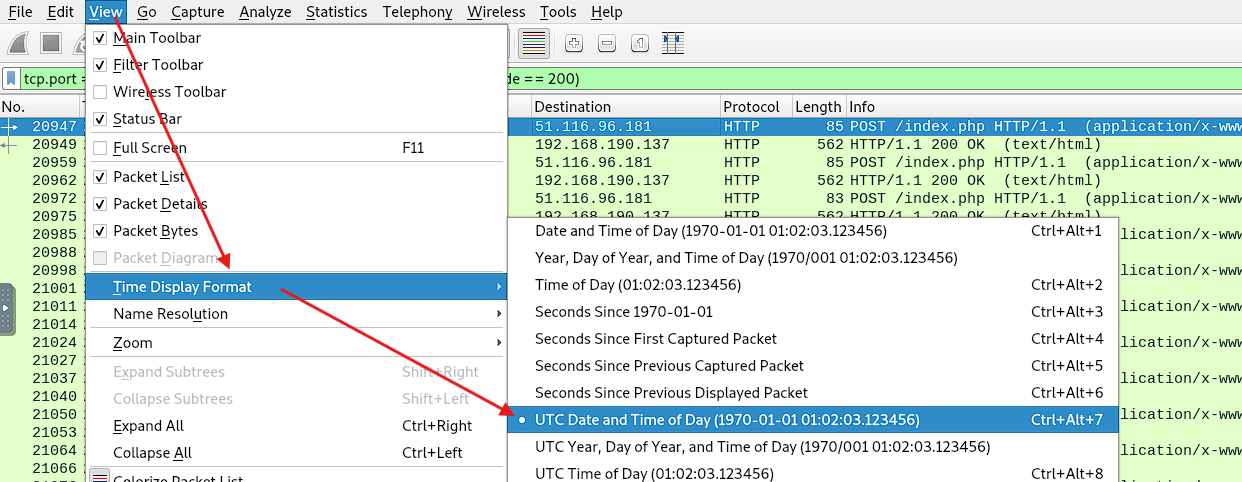
Now you can proceed. First, enter the following display filter:
1
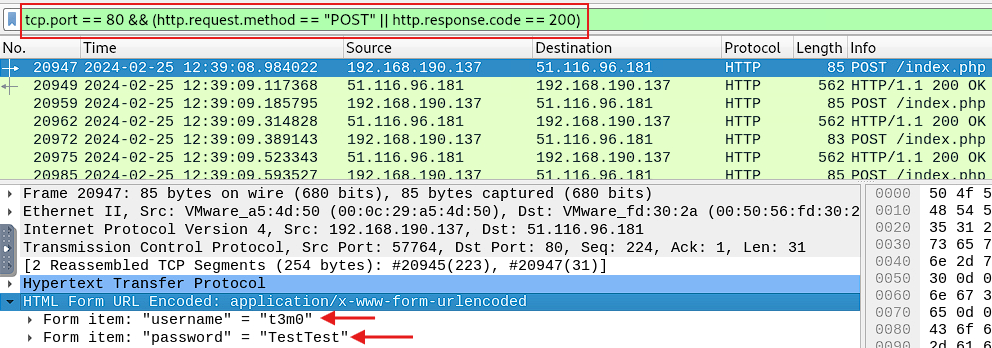
tcp.port == 80 && (http.request.method == "POST" || http.response.code == 200)
This will give you a better view of the interaction between the attacker’s IP address and the target server. For example, in this initial attempt, the attacker is trying to authenticate with the following credentials:
And the target server is responding to this action with the following:
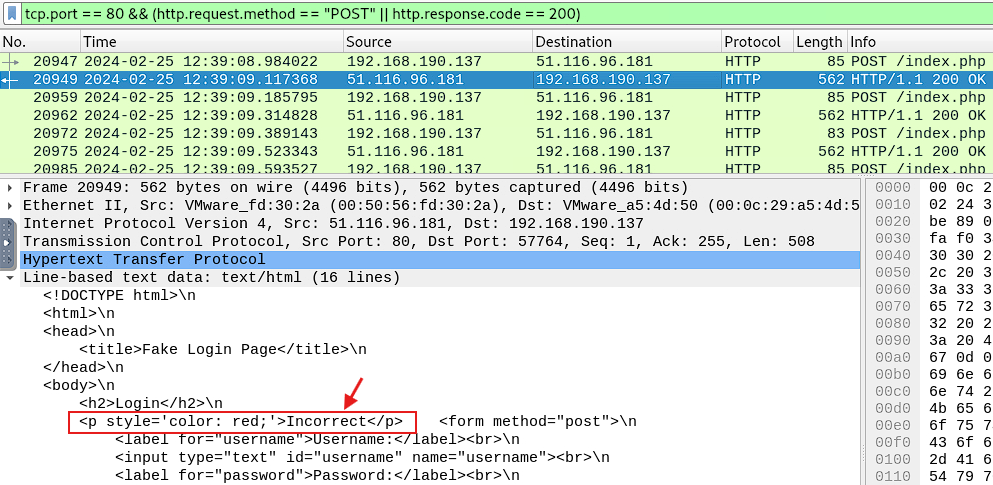
Clearly, this is a failed login attempt. This pattern repeats across all the filtered packets, with the attacker using different login credentials each time. What’s particularly suspicious is that all these requests occur within a very short timeframe, less than a minute, targeting the same IP address. Most of these login attempts failed, so yeah, you can say that the target server is under a brute-force attack.
But, the question is: who is the target server?.
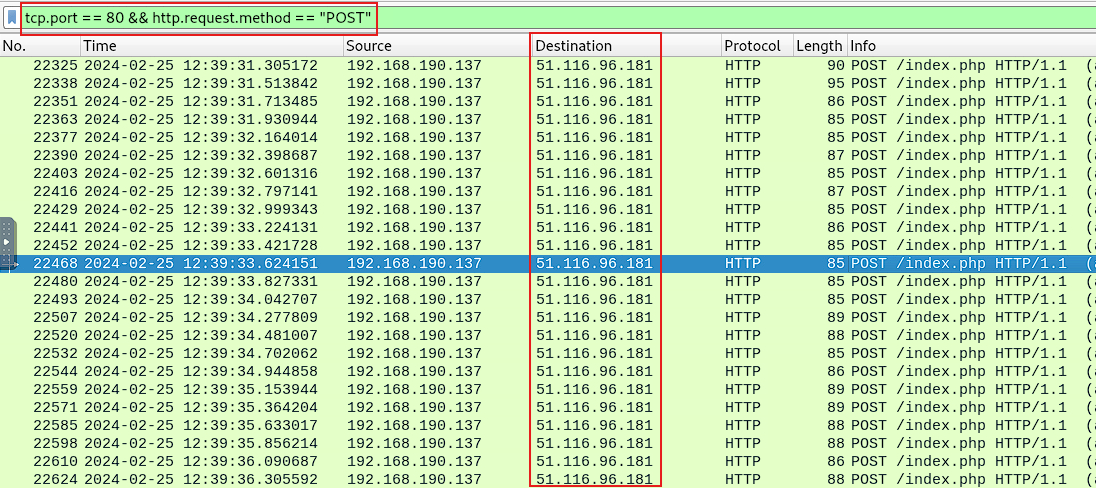
Yep, you guessed it right!. The answer for this question is: 51.116.96.181
Which directory was targeted by the attacker’s brute-force attempt?
This one is easy, just pay attention to the URI to which all the requests are being sent:
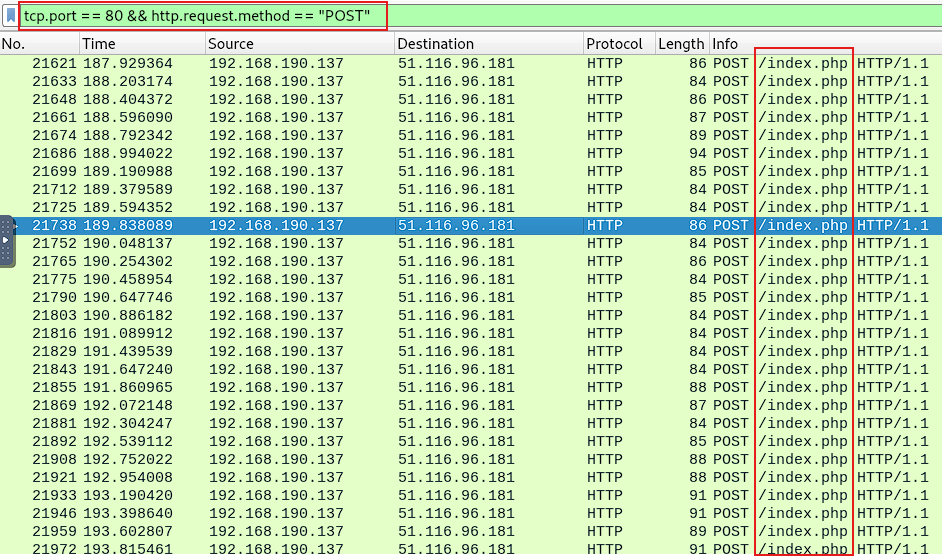
The answer for this question is: /index.php
NOTE: My initial guess was the / directory since I was asked to provide a “directory” rather than a filename. But, well, that’s just how it goes.
Identify the correct username and password combination used for login
This question is kinda ambiguous. But, it seems there has been a successful login during the brute force attack on the target server. So, you’re being asked to provide the user:password combination that succeeded.
Since most failed login attempts return an “Incorrect” login page, it’s logical to expect that a successful login might return a “Correct” page. Let’s check if there’s a packet containing that information.
I suggest you to maintain the HTTP conversation between the attacker and the target server with the aforementioned display filter:
1
tcp.port == 80 && (http.request.method == "POST" || http.response.code == 200)
Next, try to find a packet whose details contain the keyword >correct<, as shown:
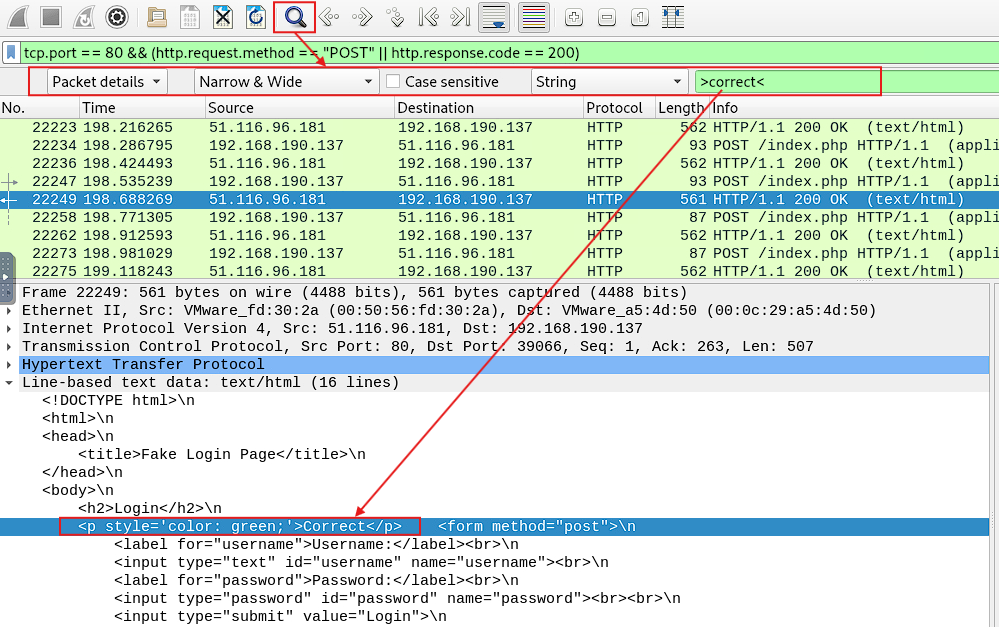
There it is! A packet containing a successful login message. To view the successful credential combination, simply right-click on the packet in question and select Follow → HTTP Stream:
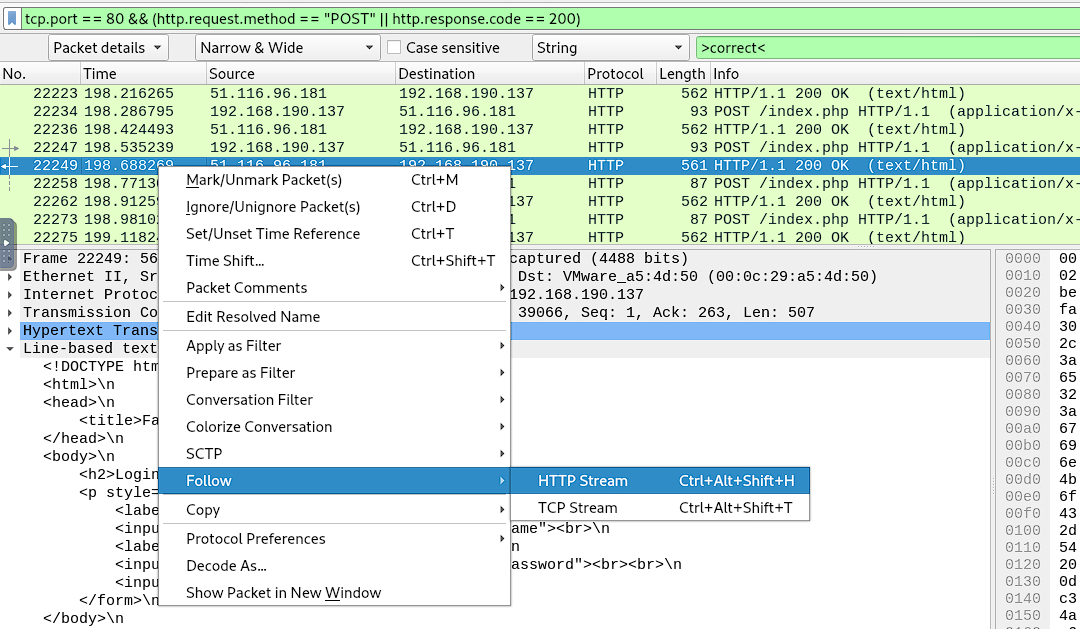
You’ll be able to see the HTTP Stream conversation more clearly:
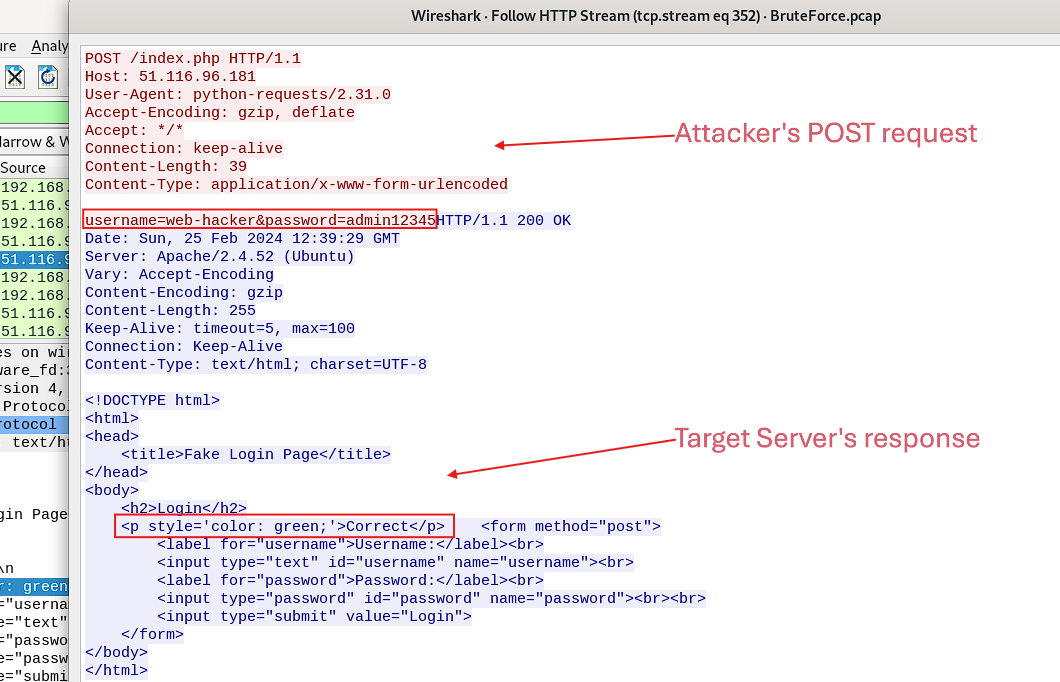
Now, you can easily answer this question: web-hacker:admin12345
How many user accounts did the attacker attempt to compromise via RDP brute-force?
TCP port 3389 is the default port for RDP traffic. Since I don’t have any RDP credentials or authentication details at hand, at least I do have packets that represent an RDP negotiation phase between the client and the server. I think with this information you can tell if the target server is being under a brute-force attack.
Jus simply use the following display filter:
1
tcp.port == 3389 && rdp.neg_type == 0x01
Let’s break this down:
tcp.port == 3389: It filters RDP traffic.rdp.neg_type == 0x01: It filters only RDP Negotiation Request packets.
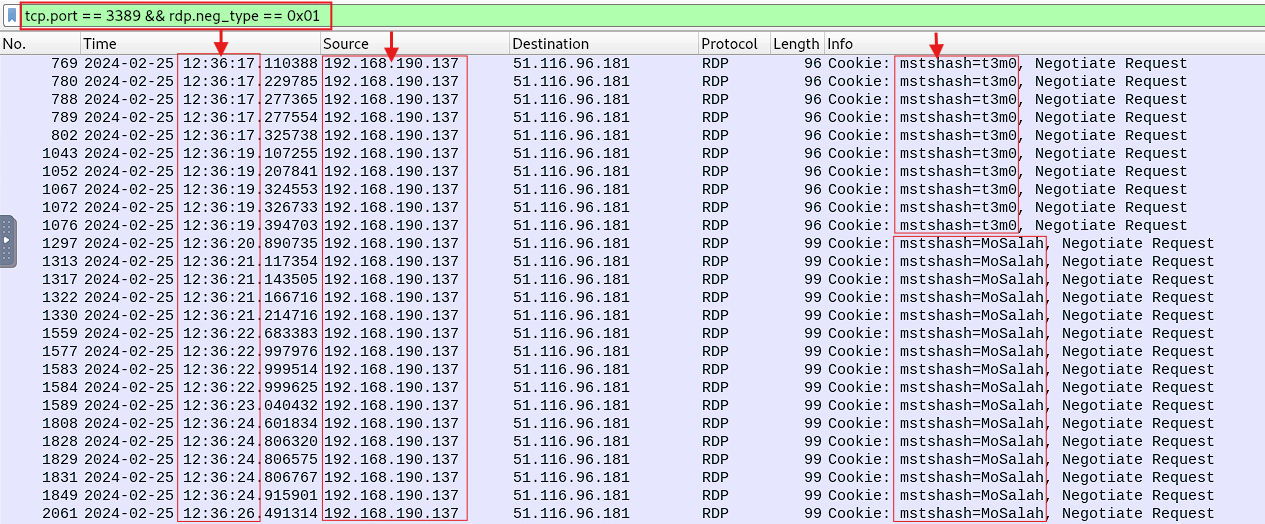
Can you spot the pattern from the highlighted sections? . Yes, you can tell there’s an RDP brute-force attack going on, since there’s a high frequency of RDP Negotiation Requests packets initiated in quick succession from the same source IP address coming from different usernames within a short time interval. It’s clear that the attacker is trying to establish a RDP session using different usernames.
To answer the question you’re being asked, you’ll need to extract only the usernames from these packets. To do that, export the information into a .cvs file as follows:
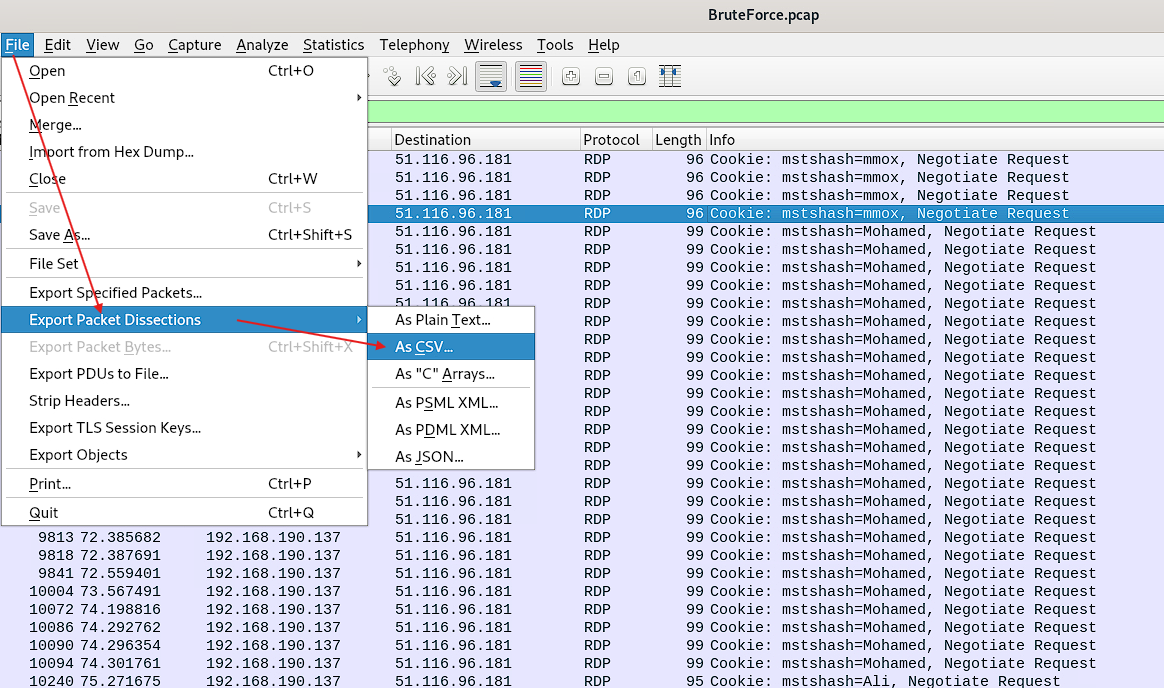
Now, open your terminal and run the following command against the recently exported CSV file:
1
grep "mstshash=" rdp-users.csv | grep -o "mstshash=[^,]*" | cut -d'=' -f2 | sort -u

As you can see, when you count them, there are 10 users attempting to compromise the target server via an RDP brute-force attack.
So, the answer for this is question is: 10
Surprise, surprise!, LetsDefend didn’t like your answer, don’t worry, mine didn’t pass either.
I’m not sure, maybe the question is poorly worded or a bit tricky. Anyways, if you take a closer look at the target server’s IP address 51.116.96.181 that’s being under an RDP brute-force attack, you’ll find out it’s the same as the HTTP server from the first question. So, just a hunch, but maybe this question is actually referring to an HTTP brute-force attack, not RDP. Let’s put this theory into practice.
First, display all the POST requests sent to the target server:
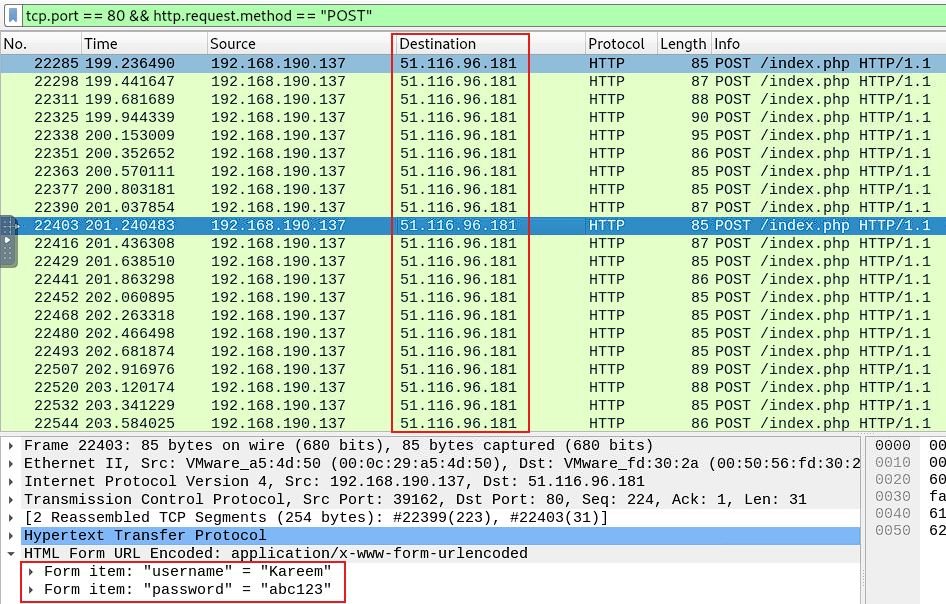
As you already know, from this information you’ll have access to the attacker’s credentials being use to brute-force your target server. Now, export all of this information, but this time in plain text format:
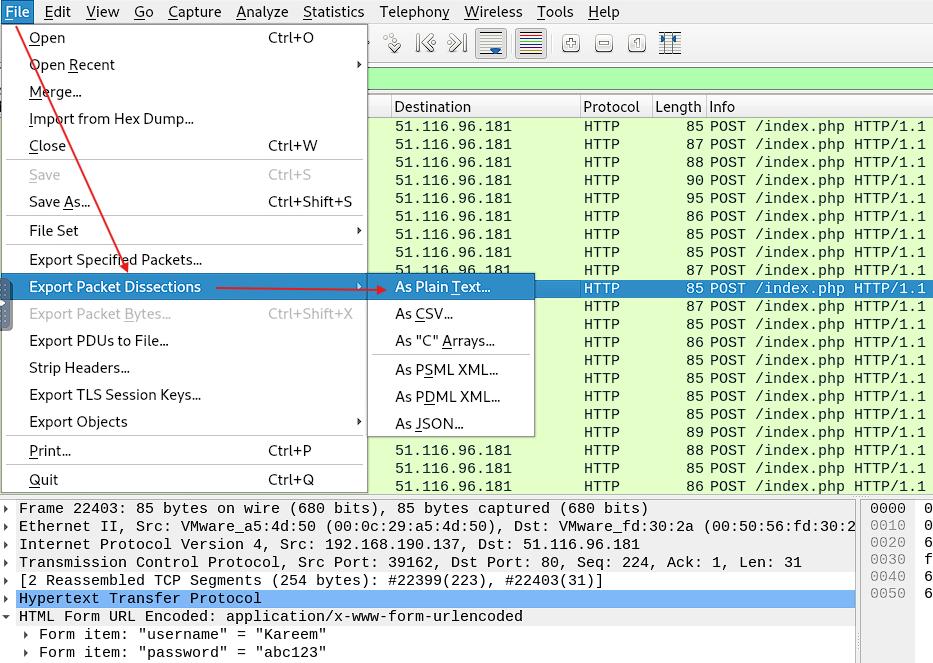
Proceed to your terminal and inspect the content of your recently exported text file. You should see something like this:
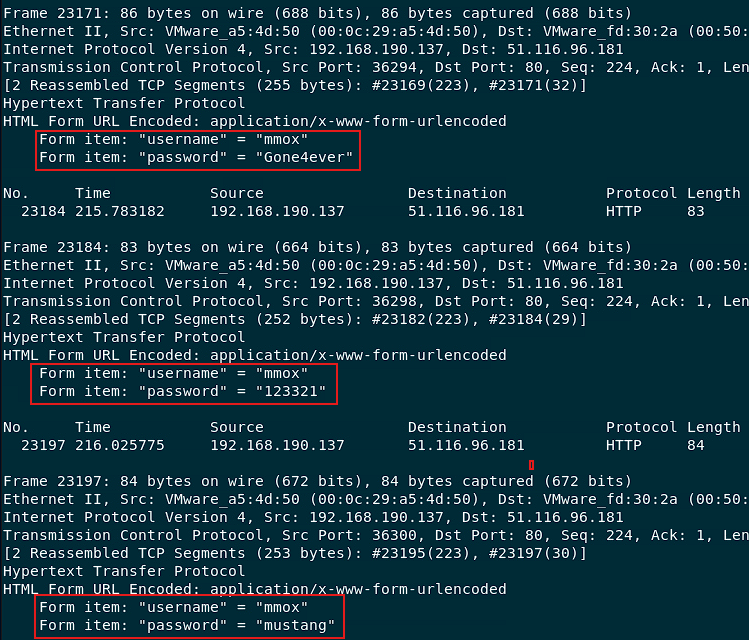
There is the information you need. To pull it out, run the following command against it:
1
grep "username" http-users.txt | grep -o '"username" = "[^,]*"' | cut -d'=' -f2 | sort -u

Count every entry from the output and you’ll have your answer. You can confirm this by adding a wc -l command to your pipe:
1
grep "username" http-users.txt | grep -o '"username" = "[^,]*"' | cut -d'=' -f2 | sort -u | wc -l

So the answer for this question is: 7
What is the “clientName” of the attacker’s machine?
This question is asking you to obtain the value of the RDP clientName field. To obtain this information simply run the following display filter:
1
tcp.port == 3389 && rdp.client.name
Pick any packet you want and navigate through the Remote Desktop Protocol tree as shown:
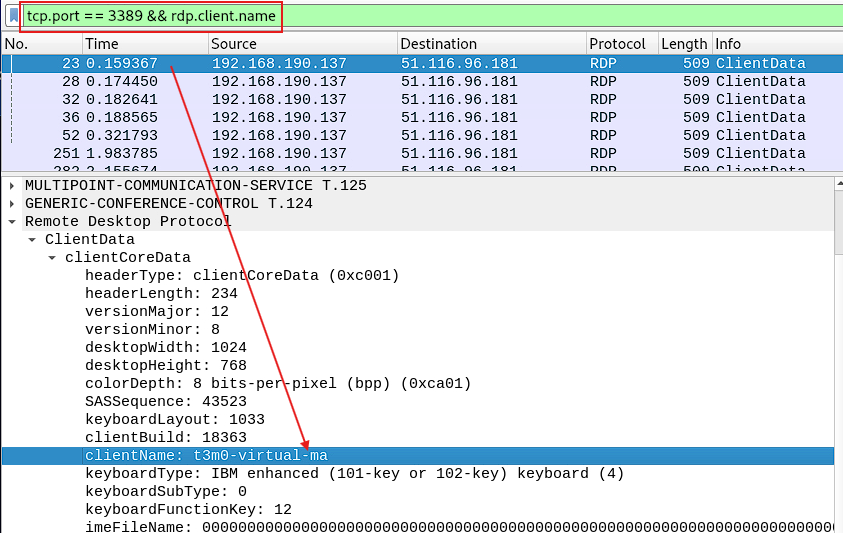
Easy peasy, right?. The answer for this question is: t3m0-virtual-ma
When did the user last successfully log in via SSH, and who was it?
This one is easy. To answer this question, you have to use the provided auth.log file.
So, rather than manually scrolling through thousands of log entries in the auth.log file hoping to find the answer, you can automate this process.
See, you can easily identify a successful login by looking for entries that contain either of the following texts:
1
2
Accepted password for ...
Accepted publickey for ...
So, open your terminal and run a simple grep command:
1
grep "Accepted password" auth.log
The result is something like this:
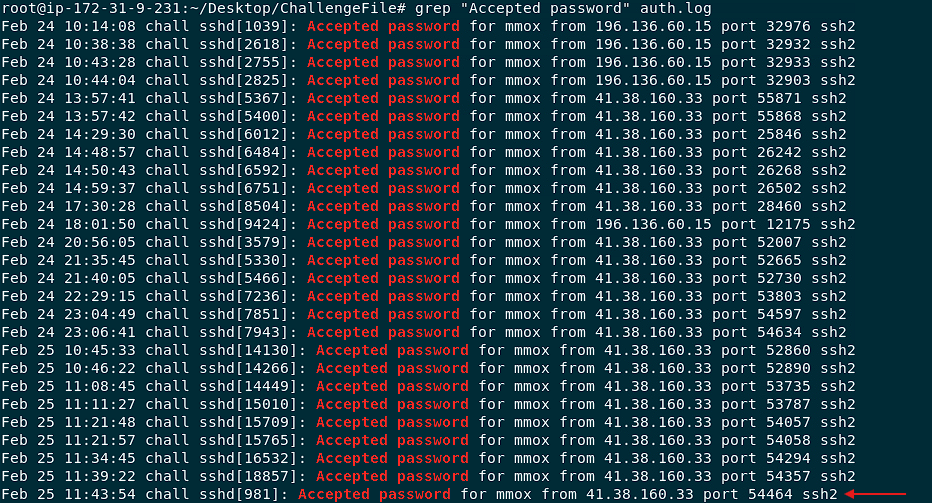
The last log entry in the output contains your answer: mmox:11:43:54
How many unsuccessful SSH connection attempts were made by the attacker?
A failed login attempt can also be recognized by log entries containing text such as:
1
2
Failed password for ...
Invalid user ...
So, to answer this question just simply run the following command while you’re still in your terminal:
1
grep "Failed password" auth.log | wc -l

So, the answer for this question is: 7480
Optionally, if you want a better overview of the failed attempts, let’s say by IP address, run the following command:
1
grep "Failed password" auth.log | grep -oE "[0-9]+\.[0-9]+\.[0-9]+\.[0-9]+" | sort | uniq -c | sort
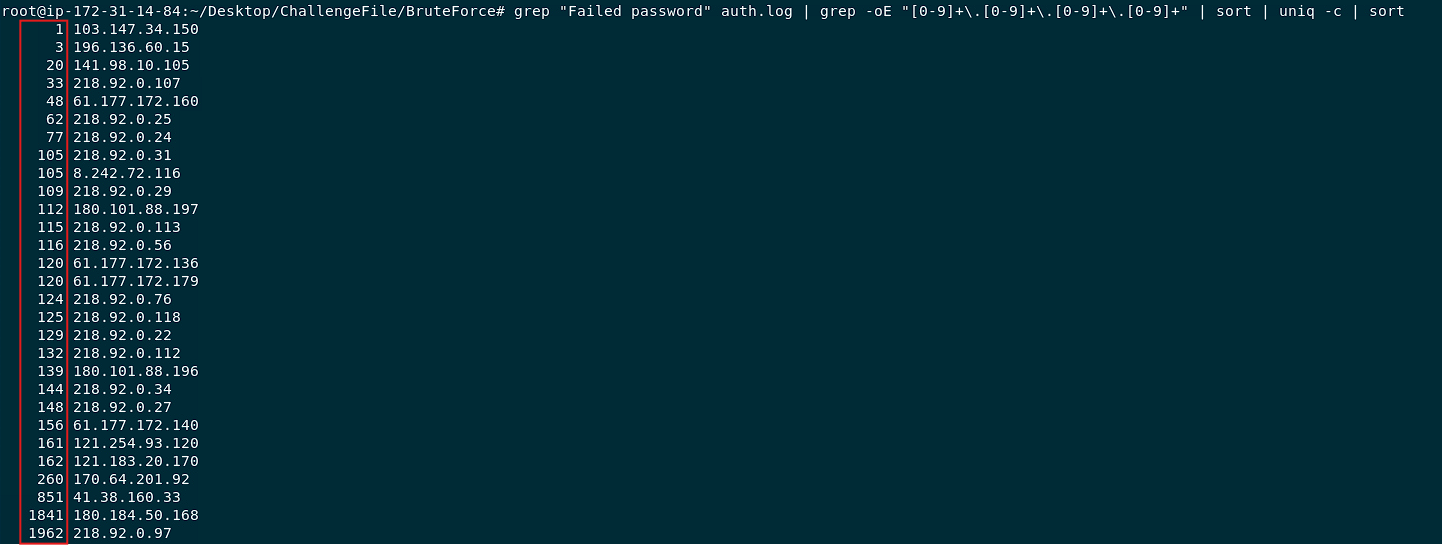
If you add up all those numbers, you’ll get the total number of SSH failed attempts. Or, if you prefer to get straight to the point, simply use the following command:
1
grep "Failed password" auth.log | grep -oE "[0-9]+\.[0-9]+\.[0-9]+\.[0-9]+" | wc -l

What technique is used to gain access?
Throughout this walkthrough, you’ve seen how an adversary attempts to gain unauthorized access to RDP accounts, SSH accounts, and web application accounts using a technique known as Brute Force.
According to the MITRE ATT&CK framework, Brute Force is a technique used to gain access to accounts when passwords are unknown or when passwords hashes are obtained. Though the question you’re being asked isn’t entirely clear, it is basically asking you for the ID of the Brute Force technique, which according to MITRE ATT&CK documentation is: T1110.
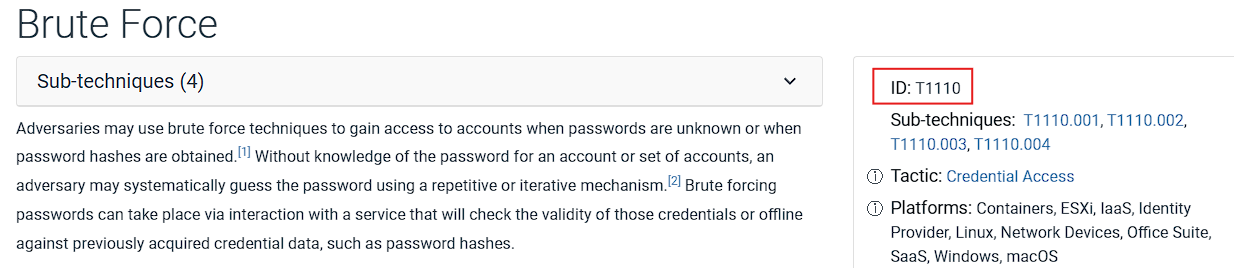
Therefore, the answer for this question is: T1110
Thanks for following along with this challenge. Keep practicing and applying what you’ve learned. Until next time, happy hunting!.